Welcome to Paulina Kitchen. On this occasion we are going to cook a saving, easy and economical recipe: chard torches .
Yes, those that your grandmother surely prepared or that you ate in a neighborhood still life, or that you prepared on your time at home with an chard tied about to die .
They are a classic, but with their tricks and secrets so that they are really rich. And that's what we're going to talk about today. How to make simple chard torches go from being “one more dish” to being a dish that they ask for more!
So you encourage you to prepare them. In the end, we leave you an easy recipe for chard torches to add to the list of your favorite recipes.
Content table
About the chard torch
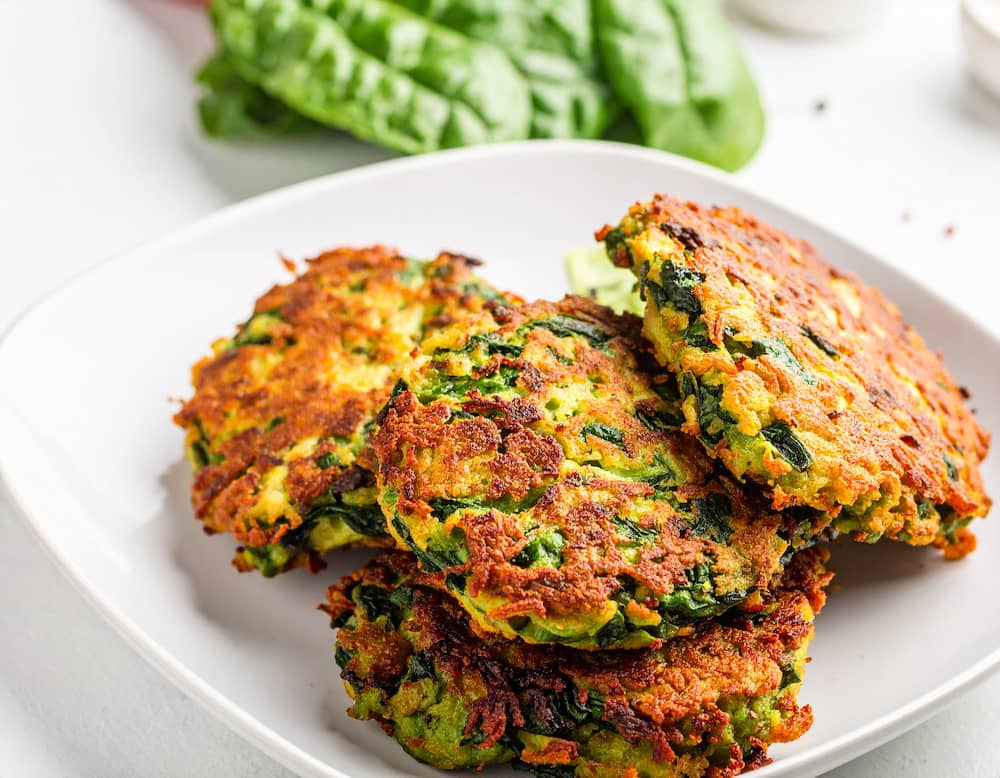
The chard torches are a mixture between hamburger and tortilla, where the chard is the absolute protagonist. They can be done in the oven, fried or in a pan with a little oil.
- They are rustic, tasty and versatile , they have everything. They can go well as main course , entrance or garnish, since they complement each other perfectly with other flavors.
Contrary to what many think, chard torches with flour are not the same as fritters . Here there is not so much air or ball shape, but rather a crushed form, which can be eaten both warm and cold .
Whether they are French or baked chard torches, there are so many options that become the champions of the food or the picnic. Each one can adapt the recipe for chard torreas to their liking.
Although the classic recipe for chard torrejas is simple, it admits the incorporation of other ingredients to give them a different touch: grated cheese , chopped garlic , sautéed onion , fresh parsley , different condiments such as ground or provezal chili.

7 qualities to love chard torches
- They are very economical: they use basic ingredients that are usually accessible to most households, an ideal option to eat rich without spending much . A chard tied to several portions.
- They are surrender: with few ingredients, a considerable amount of torrejas , perfect for preparing and freezing ( Mealprep ).
- They are versatile: they can be served as the main course accompanied by a salad, such as entrance, or as a garnish of recipes with meat , chicken or fish. They adapt to different occasions.
- They are quick to prepare: once the chard is cooked, the process of assembling the mixture and cooking the torches is quite fast. A tip : cook the chard in advance and leave on a strainer in the refrigerator, thus drain the liquid well.
- They all like everyone: because of their texture and taste, they are a dish that has good acceptance in both adults and children, facilitating family meals.
- They allow the use: they are an excellent way to use the chard that left over another preparation, avoiding food waste.
- Frigues or baked, they always win: French chard torches have that taste of childhood, kitchen with rich smell. Baked chard torches are lighter but equally tasty if they are brown well.
Torrejas vs. Chard Buñuelos: Understanding the difference
torches are confused with chard fritters , and although both are chard preparations, they have characteristics that distinguish them. The main difference lies in the composition and texture of the mass.
- Buñuelos usually wear more liquid, some of the lifting, they are made with a thick beaten type mixture and fries in the form of tablespoons. They are inflated, rounded and fluffy.
- The chard torches , on the other hand, are more compact, tortita type. They can also be made, but their texture is more similar to a vegetable hamburger.
In summary: the torrejas focus more on the chard linked by a simple mass and are dense; Buñuelos are based on a more aerated containing the chard, being more fluffy. Both are excellent ways to eat chard, but with different textures.
With what to accompany the chard torrejas: 5 ideas to serve
- With potato or pumpkin : classic classic. Double texture and a lot of flavor.
- With fresh salads : purple tomato and onion, grated carrot, choleslaw . The fresh divine contrasts with the crispy.
- With rice or legumes : They put together a vegetarian and power dish.
- With Dips : a tower with a little Alioli , a spicy sauce or a chimichurri . No more is needed.
- As garnish : The chard torches go very well with roasted meats or the iron, chicken, or baked fish . They provide a nutritious touch to the plate.

8 tips for crispy chard torches
- I cooked and drained the chard: Hervi chard or steamed to steamed only the right thing: it has to be tender but not undone. Then, it is important to squeeze it very well to get all the water. If not, the torrejas leave soft or disarm.
- Add flavor with condiments: Do not stay alone with salt and pepper. The nutmeg , chopped garlic , a little sauteed onion , fresh parsley or a pinch of ground pepper lifted the taste. Grated cheese is a plus that adds to taste and texture.
- To achieve good texture: add grated cheese or in strands helps the torrejas brown better. A little breadcrumbs or snapshot also improves the consistency of the mixture and provides crocancy.
- Give the form: if the mixture was done following the steps, it should not be difficult to shape them. Use two spoons to assemble them prolific, round or oval type, as you like.
- Cook without stack and in batches: either in the oven or fried, do not put too many together. They need space for cooking couples. Once ready, not the stacks , because they get wet with steam and lose crocancy.
- Hot frying oil: the temperature has to be medium-high . If it is very low, the torches suck oil like sponges and are heavy. If it is very high, they burn on the outside and are raw inside.
- For the oven: if you do them in the oven, preheat well at 200 ° C and use a brushstroke plate with oil or nonstick paper. That helps to brown the base well without sticking.
- Use absorbent paper: after frying them, put them on paper paper just a moment to leave excess oil. Do not leave them there for a long time because they get wet and can hit.
Follow on Instagram ( here )
and on YouTube that I upload new recipes every week ( click here )

Easy Chard Torch Recipe
Yield: 10/12 units
Preparation time: 45 minutes
Ingredients
- 1 large chard tied (only leaves)
- 2 eggs
- 3-4 CDAs. of flour (it may be more according to consistency)
- 1 minced garlic clip or 1/2 cdta. garlic powder
- Salt, pepper and nutmeg to taste
- 2 tablespoons of grated cheese (optional, but highly recommended)
- Fry or brush oil if they go to the oven
How to make Step by Step by Step
- Wash the chard well and boil it in salt water for 5-7 minutes since the boil breaks, or steamed it for about 8-10 minutes, until they are tender.
- Drain and squeeze the chard to eliminate excess water. It must look dry. Chop it finely and put it in a bowl.
- Add the eggs, garlic, condiments, grated cheese (if used) and flour. Mix until you get a thick paste, which can be molded with two spoons or with your hands. If the mixture is very soft, add 1 more tablespoon of flour, it can vary according to the moisture of the chard and the size of the eggs.
- Form the torreles of the desired size. If they stick a lot, sprinkle a little more flour on the surface or hands.
- To fry: heat oil in a pan and cook the torches over medium heat, 3 to 5 minutes per side or until golden brown. Remove and let stand on absorbent paper.
- To bake: Preheat the oven at 200 ° C. Place the torchs on an oiled or with butter paper brushstroke with oil. Bake for 5 to 7 minutes per side, until golden brown. Turn with spatula with care in half cooking.
- Let cool a little and enjoy!