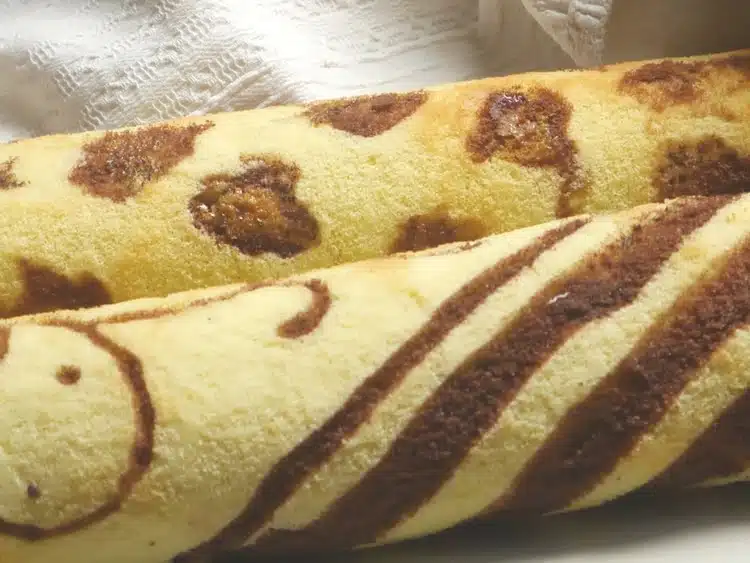
In this program… Paulina shows us how to make a homemade and much more original Pionono: Printed Pionono!!
Today we're going to learn a trick that will help us surprise you this coming holiday season. Most or all of you know how to make a Swiss roll, but few know how to print designs or letters on the dough! It's all homemade!
About the Printed Pionono Recipe
What I like most about this recipe is that, in addition to having an original design, we're going to prepare a homemade Swiss roll dough that turns out delicious; you can really taste the difference.
I hope you'll be encouraged to try it and, as Paulina asks in the video, to suggest cute new recipes like a printed roll cake for the holidays!
Until next ...
Nicola Garupa
Producer
Click here to follow me on my YouTube channel I upload exclusive for this network!
Printed Pionono Recipe
Ingredients for 1 roll
- 75g of self-rising flour
- 100g of sugar
- 3 eggs
- 2 tbsp. cocoa powder
- yellow dye
How to make a printed Pionono
step by step
- Cut the parchment paper to the same size as the rectangular dish in which we are going to cook it.
- Place the wax paper upside down, right side up, and draw with a pencil what you want to print on the Swiss roll. Keep in mind that if you write, you'll also have to do it backwards. You can draw lines or shapes. To understand it better and see more ideas, watch the video! Set aside the wax paper.
- In two different bowls, separate the egg whites from the yolks.
- Beat the egg whites until stiff with a mixer or mini blender attachment.
- Mix the egg yolks with 100g of sugar and beat well until the mixture turns white and thickens.
- Then add 75g of self-rising flour and a teaspoon of baking powder to the egg yolks. Mix with a spatula, using circular motions, until well combined.
- Once it's combined, add the beaten egg whites and gently mix again with the spatula. It's important not to rush.
- Let's separate a small amount of this mixture into two parts and set aside the rest. Add a large spoonful of unsweetened cocoa powder to one part, stirring until combined. Add less cocoa powder to the other part and a couple of drops of food coloring of your choice.
- Place the mixtures in two piping bags and use these mixtures to re-draw the drawings on the parchment paper. This time, we'll flip it over and do the same on the other side, as if we were tracing. To better understand this step, I also recommend watching the video.
- Place the drawings in the freezer for 20 minutes. They should not freeze, just remain very cold.
- Once it's completely cold, we place the paper in the dish and place the rest of the dough mixture on top.
- Bake at 180°C for 7-8 minutes, depending on the thickness of the Swiss roll. It's very important to respect the temperature and time, as if it's overcooked, the patterns won't be visible.
- As soon as we take it out, we'll place it on a damp, wrung-out towel with parchment paper. This should be done while it's still hot, and while it's rolled up, we'll wait for it to cool.


The sponge cake doesn't stick to the wet repairer?